
 So, I like to do Yondu at Cons. Like, I REALLY like it. It also seems to be SUPER popular with
 folks that see me - I mean, come on, the Big Blue Idiot is the best, right?
I am in no way very movie accurate, but I have gotten the makeup to a place that I like. This article is about my journey there. I'm going to walk you through how I got to being satisfied with my Yondu presentation from a makeup perspective. I'm going to list/link the products I use, so keep reading to see all that.
The first thing I want to say is that I have had a LOT of help. Without the help of the crew from Zinstudios Cosplay, The Kid and ComicKazeCosplay, I'd never be able to pull this off. From airbrushing, to helping me with the fin and generally putting up with me and this process, I want to say thanks!

Guardians of the Galaxy Vol 2 was still in theaters when I decided to put this costume together. I made the decision pretty soon after seeing the movie and raced (for me - I'm kinda slow) to get this thing done for AwesomeCon 2017.
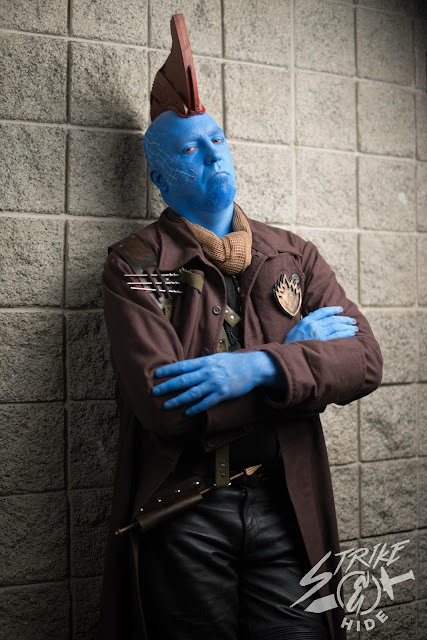
To the left, see what I was able to get done. I was SUPER happy at the time, and I got a LOT of attention at the Con. People loved it!
I had done some research online and decided to use Mehron Paradise AQ makeup. My research indicated that it was quite cheap, stayed well with some Ben Nye Final Seal and Mehron Colorset, and was easy to put on and take off. I had used some of this on my hand for my Hellboy costume, and all that proved to be true.
Update Late October 2018
Ok, so - yet another update. I tried another combo for the makeup -- I think it is the best yet.

I used the MAC Chromaline Hi-Def Cyan product below around my eyes and for eyeliner. I used a small eyeshadow brush and a liner brush.


For the rest of the areas, I used the ProAiir Hybrid Atomic Bio-Hazard applied with a large kabuki brush. This stuff is alcohol-based and stayed on REALLY well. It was fairly hard to get off, though. I used a combo of liquid soap with no water, baby oil and makeup wipes.
Also, I did end up using the Ben Nye Final Seal and Powder over this -- it keeps it from getting too dewy when I sweat at Summer Cons.

Update Early October 2018
I found out that the actual effects team used some MAC Hi-Def Cyan products on Rooker, so I went ahead and purchased some products.

MAC Chromacake Hi-Def Cyan (or just regular Cyan - same thing)

Applied just like the Mehron Paradise AQ listed below.
End Update
 |
| Soooo good. Anyone know what they used on set?? |
At this point, I was painting on the scars on my right side. I used some Light Blue from the Mehron line to highlight those.
When I got to looking at the pictures, I decided that my makeup was WAY too dark. I mean, I was blue, had a fin and bad teeth, but I wasn't really close to the Yondu that I wanted to be.
I decided to look for a better shade of blue, and since I was happy with my product, I turned to the same brand.
 |
| A - Dark Blue, B -Sky, C - Light Blue These look a LITTLE darker than they are in person. |
Of course, I asked the Internets and I ended up going with B - Sky Blue Paradise AQ from Mehron. This produced a MUCH better shade of blue. I also used some of the old dark blue to add in some details of the veins/spider webbing you see on Yondu in places.


 |
| Someone please find out what was used for the movie! Probably something SUPER expensive and bespoke! |
I still felt like I needed to improve the makeup, and the scars was a good place to start. In looking around the Interwebs, people had used Puffy Paint for some similar effects directly on the skin. I was reluctant to do that for fear that it would come off and also because this would again burden my crew with even more work helping me get ready. I looked online and decided to make a latex appliance.

I took some quick measurements and drew out a little pattern on some paper. I then cut out the lines and transferred the marks to a flat piece of kydex. I made sure to use the textured side of the kydex to give the appliance a little bit of texture and not just be super smooth.

I made a box around my puff paint with some scrap foam board and a hot glue gun. I then mixed up some Plaster of Paris and let it dry.

The mold came out perfectly! I was very happy! I then used some Ben Nye Liquid Latex from a local store (Mehron Liquid Latex works too - don't use the Halloween store kind) to brush on several layers - probably 5 or so - on to the mold. When that all dried, I used some Mehron Powder with an Elf Total Face brush when pulling up the appliance so it didn't stick to itself and everything else.
 |
| Pic Reversed, but you get it. |
Prepare your skin for the appliance - and the makeup, really - by using some Witchhazel to clean up your head and face. This helps get any dirt or oil off your face and tightens up the skin.
To apply this thing, I used Spirit Gum for the base tackiness - just slap some on a wedge and go to town on the side of your head. You are bald, right? You aren't? Oh, sorrrrrrrry.
Pros-aide was used to go over the appliance (so the makeup sticks) and stick down areas that were troublesome. I used some Eyelash Glue with a spatchel to try to blend in the areas that transitioned from appliance to skin with varying results. I was not very good at this and I think it shows below.
To get this thing off your face, make sure you get some Spirit Gum Remover or else you could damage your skin! Use a Q-Tip and rub the gum on the appliance and under it one you get a corner up.

Here's the Kid highlighting the scars after they are applied. This doesn't look too bad from a little distance...

...but I wasn't super happy with the look up close. I watched a TON of videos about putting on this stuff and I just could not make it look good. I tried thinner edges on the appliance, I tried thicker ones. I could not get this thing to look good enough to me.
 |
| Derpy face and really poorly blended appliance. |
 |
| Fine from a distance. |
So. I am guessing that MANY of you have already thought up the solution - cut it out. Like, just cut the stupid scars out and glue'm. Well, that took me a while to figure out, but I got there.
 |
| Much better, no? |
 |
| Pleased with this. |

Above, see the airbrush on the index and thumb, the AQ on the middle finger.

 |
| New Airbrush Makeup |
I ended up going a bit lighter, and mixed two Mehron Liquid colors:
Mehron Liquid Makeup Blue
Mehron Liquid Makeup Moonlight White <- this link is for the small one, but you want the 4.5oz
Mehron Mixing Liquid

I mix the colors up best I can to get close to the lighter blue that Yondu has. I add in a fair amount of mixing liquid so that it doesn't clog up the airbrush too bad. I do a base layer - with help - and then add in some darker blue patches blotched on with a large makeup sponge. I then draw on the veins. Next, we go back and blend in the patches and the veins and try to get any missed spots.
You may have also noticed that I added in some sparkles. Yondu is pretty sparkly!

I use this cut-down, crappy chip brush with some Mehron Metallic powder that I mix up pretty thin with mixing liquid. We then just kinda flick some on to my makeup and blend in if we get too much with the Grex airbrush, which I love!

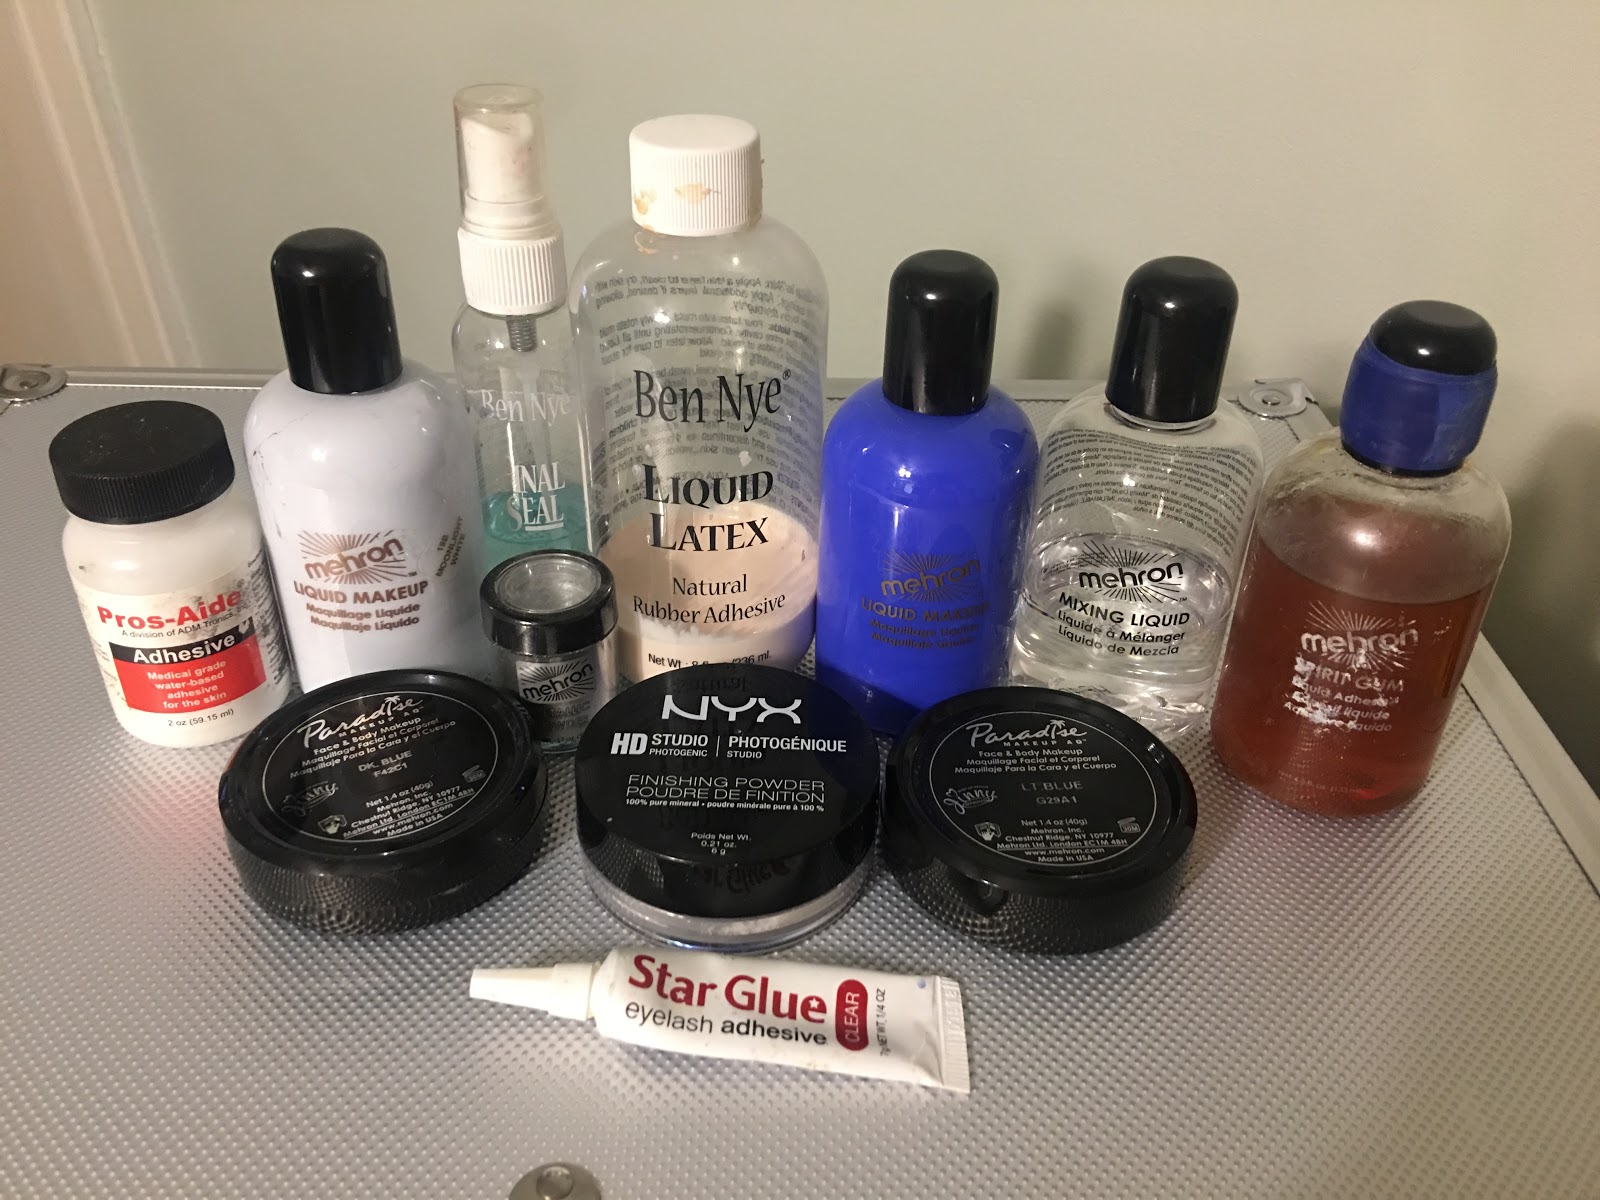 |
| Uh, lots of stuff. |
So, that's it! Easy, right? It takes me about 2-2.5 hours (with help) to get this all together. I find that it stays pretty darn good, and I have done an 8 hour day with it all on.
Got questions? Ask away here, or hit me up on Instagram: The Confather
 |
| Liking this from NikNak Art |
Comments
Post a Comment