
 |
| Edrio with his correct rifle. |
When I watched Rogue One, I was on the lookout for cool looking guys for my next possible costume. I was drawn to the Saw Gerrera alien guys who I later found out were Edrio and Benthic Two Tubes. In fact, these guys were so "me" that I got several messages asking if this was next on my list. I did some research afterward and decided that the helmet was beyond me. But, I decided, if someone makes the helmet, I'm in. Right on cue, SithCamaro announced he was making a helmet and it was game on.
I had previously ordered a Sidon Ithano helmet from him, so I was quite confident in his work.
Now, I started looking at the costume, and tried to figure out how to get the rest of it together. If you are working on this character, I hope this helps you build your own Edrio (or Benthic) Two Tubes.
First things first - the San Diego ComicCon pictures of "Edrio Two Tubes" that came out before the movie are just plain wrong. That setup has half of Benthic's stuff and half Edrio's. Be very careful with the reference pics you find, even the ones in the Rogue One Visual guide, which show Edrio with the wrong rifle in most pictures. Please go re-watch the 18 seconds (yes, 18 seconds!) of screen time Edrio gets. For Benthic, there is much, much more.
The Helmet
I got all the pieces of this excellent kit. I did have to correct a few things on the shape of the helmet in the back that have since been corrected in the master mold. Also, the breather mask should now come attached to the helmet - attaching that was not fun. I was concerned with my huge noggin' not being able to fit, but this helmet is quite roomy.
I did find that some of the areas are quite thin, so I proceeded to reinforce them with worbla.


For air flow, I decided to make the vents and holes on the front of the mask functional. I started with a drill and put some holes in between the slats. I then used a variety of small saw and hacksaw blades to open up the breathing vents.


I painted the breather mask first. Note that Benthic and Edrio have very different paint/weathering looks to their masks - make sure you have the correct reference. I initially wanted my tubes to be functional, so I decided to use some connectors found at my local home store (see below). I had to grind theses up pretty heavily, but I ended up with a rock solid connector.

I then used a Krylon camouflage paint that was pretty close for the base. It was then custom-mixed Vallejo Air paints to get the exact color I wanted. I used a LOT of washes and drybrushing techniques to get the look to match the reference.
Note that the forehead plate is a slightly different, more uniform color than the rest of the helmet. It is also slightly satin, not flat.
At this point, I was also planning to keep the opaque disks in the middle of the eyes, and just use mesh on the holes to see. Later, I drilled out and reinforced the eyes and put in reflective eyeglass lenses trimmed to fit.

Not pictured above, but these are the bolts I used for the temples. You can see them in close-ups of the Tubes Twins.

The "ears" that came with the helmet were ok, but I needed something more accurate and durable. I decided to go with foam and attach them to the helmet. I started with a block of EVA foam that was close to the thickness in the pictures.

There is a layered look to the ears, so I decided on layers of foam with rough-side leather. I used two-piece construction with the idea to jam in a folded piece of leather in-between to match the reference pictures. I used sheepskin leather for this and ordered a whole one.

The ear pieces are also pretty basic and you have to fill in some of the details yourself. I chose to make the thin plastic antenna magnetized for easier storage - they come out and wont break.

I then worked on adding detail to the ears. We don't have a ton of good reference, so I went for some details that mimicked what I COULD see. Some foam, a dowel or two, coiled copper wire and some other random parts around the shop seemed to do the trick.

I used some worbla and a couple of short dowels to provide a very secure attachment to the foam ears, which I glued in place. I also ground these down significantly and rebuilt the discs from foam to give a better fit and base.

The finished product. Notice several layers of foam discs to build up the look as seen in the reference. There are also some notches in these discs (more visible later) that should be replicated. It is a small but nice detail to have.

For the "disc brake" in the rear of the helmet, this is the only know high-quality image - taken by a set photographer that I cannot remember.

The disc was pretty good, but too big in the kit I got, so I had to cut it down to size. Some of the proportions are slightly off, but that is the way of things. I also added some EVA foam to thicken it up.

I attached the disc to the leather balaclava with E6000 - more on that...

The Balaclava
This thing is annoying to make and to wear. This leather balaclava thing was a total pain in the rear. I started by wrapping tin foil all around my head and neck with a layer of duct tape over it - kinda making a duct tape dummy for my neck and head.
I drew lines on the thing that matched the pictures I saw on the web. I cut the pieces slightly larger so that I could glue them together to get the look of the seam correct.

I numbered the sections so I would not get too confused.


I first used a thick denim to get a pattern that was exactly right.

Below, see the pattern put together with pins. I wanted to get all of this right before cutting up my leather - I had just enough to make this thing - no second shots. Note that I have not yet cut the pattern to make the seam from the ear down to the mask - I wanted to make sure I got everything sized right first, as this seam is very visible and needs to be correct.

Here, I have cut and glued everything together. I used E6000 on the leather and augmented a bit with some super glue to get it all to stick together well. I used clothes pins to hold everything together while gluing. This is sheepskin leather with the suede side out.


The Chest Box
Edrio has a standard Rebel chest box that is quite weathered, but otherwise standard.
I leaned on my 501st/Rebel Legion buddies for help. Luckily, my main man Stoagie had an extra box - just the shell - sitting around that he gave me. He even provided me the below pic of his for reference building mine.

I built mine out as best I could. I did the painting myself, but ordered the buttons and such off Etsy. I used a pencil eraser for putting the dots on the switches -- seemed the perfect size. For weathering, I use a variety of products from Vallejo for rust and dust effects.
 |
| I just noticed that Edrio's box MIGHT be REALLY dark and dirty grey with black like Stoagie's box. Oh well, I'm approved, so whatever! |
For the straps, they look leather to me, so I made some up and dyed them black. I permanently attached one strap in place, but used 2 D-rings to make the other adjustable. No good pics of any of this, so I winged it.
Not seen is the kydex backing that I put on the chest box - mine didn't come with a back. I used worbla and some wood screws to make sure it all attached firmly. There is not an attachment thingy from the tube to the box, so just secure the hose any way you see fit, but make sure it is secure. Pictured is the first of three tube attempts....

The Tubes
So, these damn tubes. I had a dream of making them functional. Hollow with fans in the belt pouches to circulate air and keep me comfy. Well, that didn't work. The tubes were WAY too heavy and I could not move me head. |
| Don't buy this - don't do it! |
 |
| Yes, I cut every one of these by hand - do not do it. |
 |
| Looks great, but no no no! |
 |
| I hope to use these for later projects.... |

I didn't take many pictures - I was kinda mad - so I'll describe what I did. I found two copper fittings in the store that had the inside diameter for the tubes sections - silver and black. I then used a grinder to sharpen the edges and punched out individual pieces for the black and silver sections of the tubes. I used floor mats for the silver, and 1/4" for the black I then punched a hole in the center of each disk and glued them on a piece of 10 gauge wire to make the tubes.
The next step was coating in plastidip and painting.
Anyway, finished, they look like this:

I do have to heat them up with a heat gun to get them to bend correctly. I did this initially, and I refresh the bends from time to time. Overall, they look ok.
The Hands
In looking at the hands, I started by getting some simple dark brown cotton work gloves. I could not tell if they were black or dark brown, but I think the brown fits with the color palette of the character.
I used duct tape to make templates for the armor plates - I simply put on the gloves and put strips of tape down. I then used a sharpie to draw out the patterns. I transferred these to very thin EVA foam and covered that in worbla.

After making all the pieces, I decided that the finger tips were actually covered, and not just a finger nail. For that, I just made simple foam templates again and made the fingertips.

To finish the worbla, I used a very time-consuming technique to get a very smooth surface. I did a few layers of wood glue, then layer of gesso (the white stuff) and a couple layers of shellac. I sanded between each layer with 400 and 800 grit sandpaper.

I painted these with the same mix of paints for the helmet, but used more dark grey and grey-black for the weathering in addition to the browns. I also made the user side of the fingertips black, per the reference photos I could find.
The armor is a bit shiny, so I used some Satin clear coat to seal and make them look like the photos.
To glue the pieces on the glove, I put on rubber gloves, then the cotton gloves. Next, E6000 was used to permanently attach the armor pieces to the gloves.

I believe that the hand detail is half a button snap, so I got a couple of those out of my supply and glued them in place as well.

The Belt
Due to some bad experience making pleather stuff in the past, I am now firmly committed to using real leather for everything I possibly can. I figured that the belt itself is pretty simple, but I wanted to get the pouches straight first and to make sure that I could get what looked pretty simple right.
I started with figuring out how long the belt was going to be on me to get a total length. I then worked out how wide each pouch could be and how wide the center piece needed to be with enough space in between to look right. This is going to be a custom calculation for each person, so I can't really give you numbers. But, be sure to work all that out BEFORE cutting up expensive materials.
Also, figure out how to attach your tubes to the pouches as well, as that may impact your measurements. I decided to use hose attachments (which isn't EXACLTY per reference, but provides a rock-solid connection).

Each pouch I made has 3 parts -- the main piece that is the back, front, bottom and top. Next, two sides.

There is no visible sewing on the pouches, so I glued everything in place with contact cement. For attachments, I used rivets everywhere that could not be seen.
I still had the delusion that the tubes would work, so I cut out sections of the bottom and put mesh over them for air-flow. I also embedded the tube connections into the pouch. Though this differs from the action figure, I think this is just way more secure and looks better.


The pouches were pretty close to the same size, but varied just a little. I made sure to use the most similar next to each other. Note also that 4 of the pouches are small, and two are large, so you will need templates accordingly.

The action figure has good info and as far as I know the only source for what the back of the belt looks like. It is a simple system that I was able to model as pictured. I used magnets glued inside the pouches for closure.

For the front part of the belt, I cut and dyed simple pieces of leather and riveted the sections. I had to pick out and measure the cylinders on either side to see how long the covering leather pieces needed to be.

The cylinders are simple PVC pieces from left over projects with a dowel for the top part. I added the grooves with a pipe cutter. The buckles on this piece are non-functioning decoration.

I also added the detail strips - about 1" wide - that go from the front to the back on both sides.
I used a Dark Brown gel dye for the whole belt assembly. After the dye, I spray leather with a satin clear coat before then using a leather treatment to keep it from drying out too much.
 |
| This is the leather treatment I use. |
The finished belt all ready to go. The good/bad news is that I have lost 15 pounds since making this belt and is BARELY fits anymore.

After wearing this at my first Con, I had to do something about the belt sliding down on the slick "prom dress". I went and added some wide strips of thin EVA foam to the inside - this seems to have done the trick.

The Dress & Pants
So, I cannot sew. Fortunately, I know people who can. The dress is a rip-stop parachute fabric. I foolishly ordered my fabric from Germany, because I saw a fellow cosplayer from Germany with a GREAT looking dress and I wanted that. You see, I kept seeing little squares on all the fabric I looked at. Stupid me didn't realize that that was what basically made it rip-stop fabric and that you would not see those squares more than 3 feet from the dress. So, order whatever you need locally. I needed about 6 yards -- this thing is double-layered. I'm also 6'4".


I can tell you next to nothing about how this was made, but I can put you in touch with my tailor.

We decided - finally - that the pants were a heavy cotton in brown with some folded over knee pads.

When I put these pants in my boots, I blouse them with little elastic strips I made - you can buy these as well.
I weathered the dress and the pants with a combination of airbrush and painted on colors in greys and blacks.
So, the shoulders. I don't really like mine. I made them just like the hand armor - EVA foam with worbla over and the same sealing and painting technique. Note that the top part is a bit shiny, so tape that off and hit is with some gloss clear coat. Also, use similar bolts to those on the helmet.
I secured these with velcro to the dress shoulders.

Other Stuff
I got really lucky and found what I think are very close Aldo boots in my size on eBay. I simply had to cut the strap across the front and add a little detail.
 |
| These Aldo boots may be the EXACT brad/style boots used in the movie. |
For the scarf, I just ordered a mesh net scarf and cut it in half long-ways.

So, the first thing you need to know about Edrio is that the rifle seen in most pictures with him is just plain wrong. It is Bentic's gun or some version of it that never made it to the screen. There are just a few pictures of him with the correct gun, one of which is the first picture in this article. With that, here we go!
Using the action figure and the one or two photos for reference, I drew out the whole thing on stiff paper. See the little gun in the pic below?

I then cut the main section out of EVA foam and made layers enough to hold the PVC and copper pipe that make up the gun barrels. I like for the EVA foam to have a very solid channel for the pipe to fit in to give the gun stability and make it hold well and have some balance.

After getting the basics together, I used some worbla and foam to create the bracket that holds the two pipes in place.


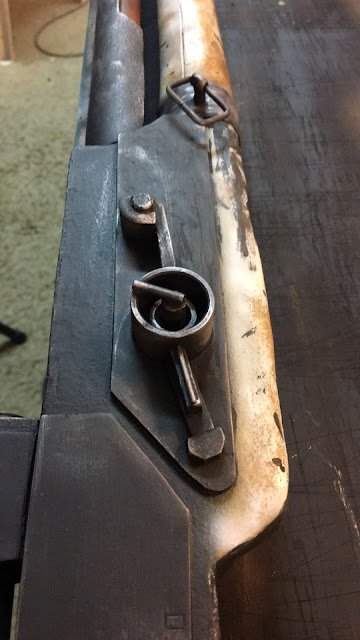
I added some detail to the barrel using wire and dowels. Some of this is not clearly visible on the model or in the pictures, so I had to improvise a bit.

I added the scope and the top shield to the gun at this point. I used some foam, some plastic card and spare pipe I had sitting around. For finishing the worbla, I just use wood glue and sanded it. Again, this rifle has a rough look and I wanted to preserve that.
You can also see on the stock where I added some EVA foam to build out details. This was sealed with Mod-Podge.

I painted the whole thing black at this point. I would go on to use the airbrush and do some drybrushing to get the look I wanted.

Bits of pipe, EVA foam and wire make up some of the details. There is a strange strap bracket or something on the side -- I made the mount out of worbla.
I made the leather details and dyed them the appropriate colors. I did have to secure these with screws to make sure they stayed in place. One is visible on the other side - a concession to practicality.

I used a lot of brown and tans on the end of the barrel to give that heat-stressed and perhaps beginning rust look. I was pretty happy with it.

Here are some additional rifle pics. Note, I'm 6'4", so I made it pretty big.


Well, that's it! Here are some pics of how my build turned out!


This is the reference I wrote for the Rebel Legion. It is NOT official (yet), but if it helps, use it!
REQUIRED ITEMS:
Helmet: Rigid helmet shaped per reference pictures, painted in a khaki/sand base color per reference. Eyes should be bright silver in color. Triangle section on the front of the helmet should be glossy, with the other sections of the mask finished in a satin or matte finish. Two black screws should be embedded into the helmet on the right and left of the front triangle, per reference. A central grey-black knob should be attached to the helmet in the top-rear, per reference. Entire mask should be weathered in dark brown weathering per reference.
Face mask for hose connections should be a weathered steel-grey color with appropriate sand/khaki rectangle color per reference. Note: Benthic’s mask is colored differently.
Ear ‘muffs’ should be covered in dark brown suede or other rough-out material. Ear discs should be of a bright silver with greeblies per reference pictures. Weathering to match reference.
Silver and black tubes should attach to the front of the mask and extend slightly below the belt and attach to the rear large pouches per reference. Note that the weathering on each tube attachment is different on right and left and should be done accordingly. The tubes may need to be attached to the pouches with fittings as a practical measure to keep them from detaching constantly if merely tucked into the pouches.
Rear ‘disc brake’ should be centered and contact the rear of the mask/helmet. This should be modeled per reference with heavy weathering and rust. Disc should be 4”-5” across and not cover the rear of the neck, per reference.
Neck: Dark brown balaclava in suede or other rough-out material. Several ridges should be incorporated per reference pictures, with three in the rear and four in front/sides. Sheepskin seems to be the correct leather.
A green/khaki mesh military scarf should be wrapped around the neck and tucked into the tunic.
Chest Box: A weathered X-Wing pilot chest box should be secured with 2 leather or leather-like black 1” straps that go from the top to the sides crossing over in the back, per reference. A silver and black-colored tube should extend from the bottom of the box to be attached to a pouch on the right side of the belt. The tube should be significantly weathered in black near the chest box per reference pictures.
Note that the SDCC reference model is incorrect, picturing both a jacket and a chest box.
Tunic: Made of a rip-stop or parachute synthetic or silk in a khaki color. The tunic is long-sleeve and should extend over the wrists. There are splits on each side that run roughly from the waist to the knee. The tunic should have horizontal bands that are approximately 2”-4” wide per reference. The upper-back of the tunic should have a triangle pattern to the bands. A zipper may be installed in the upper-back, and should be khaki-colored. The tunic should be weathered per reference.
The tunic should have a small black-metallic greeblie on the upper right chest per reference.
Shoulder Bells: Khaki-sand shoulder bells should fit tightly to the tunic and modeled per reference. Black screws should be visible on the upper third of each side of the shoulder armor. The upper half of the bell should be glossy with the remaining a satin or matte. Details should be painted and weathered per reference.
Belt: 3”-4” wide belt in dark brown with 4 small and 2 larger pouches per reference. The pouches should have a top that is closed via no visible mechanism. The belt should be made of leather or leather-like material and slightly weathered. Two additional approximately 1” straps should run from the front of the belt to the rear, passing over the hips. The belt should be buckled in the rear with two 1” silver/chrome buckles, with the straps tucked under one of the larger pouches. The front of the belt has two non-functional buckles above and below the belt with straps. Leather-wrapped weathered-silver cylinders should be on the right and left front of the belt and extend slightly above and below the belt height, per reference.
Gloves: Brown or black cloth gloves should tuck under the cuffs of the tunic. Khaki/sand rigid armor should be attached to the gloves per reference and heavily weathered. Fingertips should be covered all-around and not just have ‘fingernails’. Finder tips should be painted black. The backs of the hands are two-layered and should be modeled per reference. Near the base of the thumb and forefinger, a silver circular ‘button’ should be modeled.
Pants: Dark brown baggy pants of canvas or similar material should tuck into the boots. Three horizontal details should create knee-pads in the pants, to be made of the same base material. The pants should be weathered in black and grey per reference pictures.
Boots: Brown or dark-brown leather or leather-like heeled boots that extend approximately 1/3 to 1/2 way to the knee. The restraining straps should be disconnected and non-functional, per reference. Thinner, brown detail straps should be wrapped around the ankle of the boot and tied per reference.
OPTIONAL ITEMS:
Blaster Rifle: Double-barreled blaster rifle as seen in the actual movie and with the action figure, not reference images provided in books and other sources. Leather strapping should be on the gun per reference.

The Gun
So, the first thing you need to know about Edrio is that the rifle seen in most pictures with him is just plain wrong. It is Bentic's gun or some version of it that never made it to the screen. There are just a few pictures of him with the correct gun, one of which is the first picture in this article. With that, here we go!
Using the action figure and the one or two photos for reference, I drew out the whole thing on stiff paper. See the little gun in the pic below?

I then cut the main section out of EVA foam and made layers enough to hold the PVC and copper pipe that make up the gun barrels. I like for the EVA foam to have a very solid channel for the pipe to fit in to give the gun stability and make it hold well and have some balance.

After getting the basics together, I used some worbla and foam to create the bracket that holds the two pipes in place.

I then proceeded to cover the main stock in worbla. I was not too careful in finishing this, as the gun has a bodged together, rather rough appearance overall. I used some EVA foam on the lower grip. As with most Star Wars stuff, this gun looks like a couple of WWII guns mashed together and cut up - perhaps and Enfield SMLE.


I added some detail to the barrel using wire and dowels. Some of this is not clearly visible on the model or in the pictures, so I had to improvise a bit.

I added the scope and the top shield to the gun at this point. I used some foam, some plastic card and spare pipe I had sitting around. For finishing the worbla, I just use wood glue and sanded it. Again, this rifle has a rough look and I wanted to preserve that.
You can also see on the stock where I added some EVA foam to build out details. This was sealed with Mod-Podge.

I painted the whole thing black at this point. I would go on to use the airbrush and do some drybrushing to get the look I wanted.

Bits of pipe, EVA foam and wire make up some of the details. There is a strange strap bracket or something on the side -- I made the mount out of worbla.

I made the leather details and dyed them the appropriate colors. I did have to secure these with screws to make sure they stayed in place. One is visible on the other side - a concession to practicality.

I used a lot of brown and tans on the end of the barrel to give that heat-stressed and perhaps beginning rust look. I was pretty happy with it.

Here are some additional rifle pics. Note, I'm 6'4", so I made it pretty big.


Well, that's it! Here are some pics of how my build turned out!


This is the reference I wrote for the Rebel Legion. It is NOT official (yet), but if it helps, use it!
Edrio Two Tubes
REQUIRED ITEMS:
Helmet: Rigid helmet shaped per reference pictures, painted in a khaki/sand base color per reference. Eyes should be bright silver in color. Triangle section on the front of the helmet should be glossy, with the other sections of the mask finished in a satin or matte finish. Two black screws should be embedded into the helmet on the right and left of the front triangle, per reference. A central grey-black knob should be attached to the helmet in the top-rear, per reference. Entire mask should be weathered in dark brown weathering per reference.
Face mask for hose connections should be a weathered steel-grey color with appropriate sand/khaki rectangle color per reference. Note: Benthic’s mask is colored differently.
Ear ‘muffs’ should be covered in dark brown suede or other rough-out material. Ear discs should be of a bright silver with greeblies per reference pictures. Weathering to match reference.
Silver and black tubes should attach to the front of the mask and extend slightly below the belt and attach to the rear large pouches per reference. Note that the weathering on each tube attachment is different on right and left and should be done accordingly. The tubes may need to be attached to the pouches with fittings as a practical measure to keep them from detaching constantly if merely tucked into the pouches.
Rear ‘disc brake’ should be centered and contact the rear of the mask/helmet. This should be modeled per reference with heavy weathering and rust. Disc should be 4”-5” across and not cover the rear of the neck, per reference.
Neck: Dark brown balaclava in suede or other rough-out material. Several ridges should be incorporated per reference pictures, with three in the rear and four in front/sides. Sheepskin seems to be the correct leather.
A green/khaki mesh military scarf should be wrapped around the neck and tucked into the tunic.
Chest Box: A weathered X-Wing pilot chest box should be secured with 2 leather or leather-like black 1” straps that go from the top to the sides crossing over in the back, per reference. A silver and black-colored tube should extend from the bottom of the box to be attached to a pouch on the right side of the belt. The tube should be significantly weathered in black near the chest box per reference pictures.
Note that the SDCC reference model is incorrect, picturing both a jacket and a chest box.
Tunic: Made of a rip-stop or parachute synthetic or silk in a khaki color. The tunic is long-sleeve and should extend over the wrists. There are splits on each side that run roughly from the waist to the knee. The tunic should have horizontal bands that are approximately 2”-4” wide per reference. The upper-back of the tunic should have a triangle pattern to the bands. A zipper may be installed in the upper-back, and should be khaki-colored. The tunic should be weathered per reference.
The tunic should have a small black-metallic greeblie on the upper right chest per reference.
Shoulder Bells: Khaki-sand shoulder bells should fit tightly to the tunic and modeled per reference. Black screws should be visible on the upper third of each side of the shoulder armor. The upper half of the bell should be glossy with the remaining a satin or matte. Details should be painted and weathered per reference.
Belt: 3”-4” wide belt in dark brown with 4 small and 2 larger pouches per reference. The pouches should have a top that is closed via no visible mechanism. The belt should be made of leather or leather-like material and slightly weathered. Two additional approximately 1” straps should run from the front of the belt to the rear, passing over the hips. The belt should be buckled in the rear with two 1” silver/chrome buckles, with the straps tucked under one of the larger pouches. The front of the belt has two non-functional buckles above and below the belt with straps. Leather-wrapped weathered-silver cylinders should be on the right and left front of the belt and extend slightly above and below the belt height, per reference.
Gloves: Brown or black cloth gloves should tuck under the cuffs of the tunic. Khaki/sand rigid armor should be attached to the gloves per reference and heavily weathered. Fingertips should be covered all-around and not just have ‘fingernails’. Finder tips should be painted black. The backs of the hands are two-layered and should be modeled per reference. Near the base of the thumb and forefinger, a silver circular ‘button’ should be modeled.
Pants: Dark brown baggy pants of canvas or similar material should tuck into the boots. Three horizontal details should create knee-pads in the pants, to be made of the same base material. The pants should be weathered in black and grey per reference pictures.
Boots: Brown or dark-brown leather or leather-like heeled boots that extend approximately 1/3 to 1/2 way to the knee. The restraining straps should be disconnected and non-functional, per reference. Thinner, brown detail straps should be wrapped around the ankle of the boot and tied per reference.
OPTIONAL ITEMS:
Blaster Rifle: Double-barreled blaster rifle as seen in the actual movie and with the action figure, not reference images provided in books and other sources. Leather strapping should be on the gun per reference.
Comments
Post a Comment